EN
EN
 AR
AR
 BG
BG
 HR
HR
 CS
CS
 DA
DA
 NL
NL
 FI
FI
 FR
FR
 DE
DE
 EL
EL
 HI
HI
 IT
IT
 JA
JA
 KO
KO
 NO
NO
 PL
PL
 PT
PT
 RO
RO
 RU
RU
 ES
ES
 TL
TL
 IW
IW
 ID
ID
 LT
LT
 VI
VI
 TH
TH
 TR
TR
 AF
AF
 MS
MS
 KM
KM
 LO
LO
 MY
MY

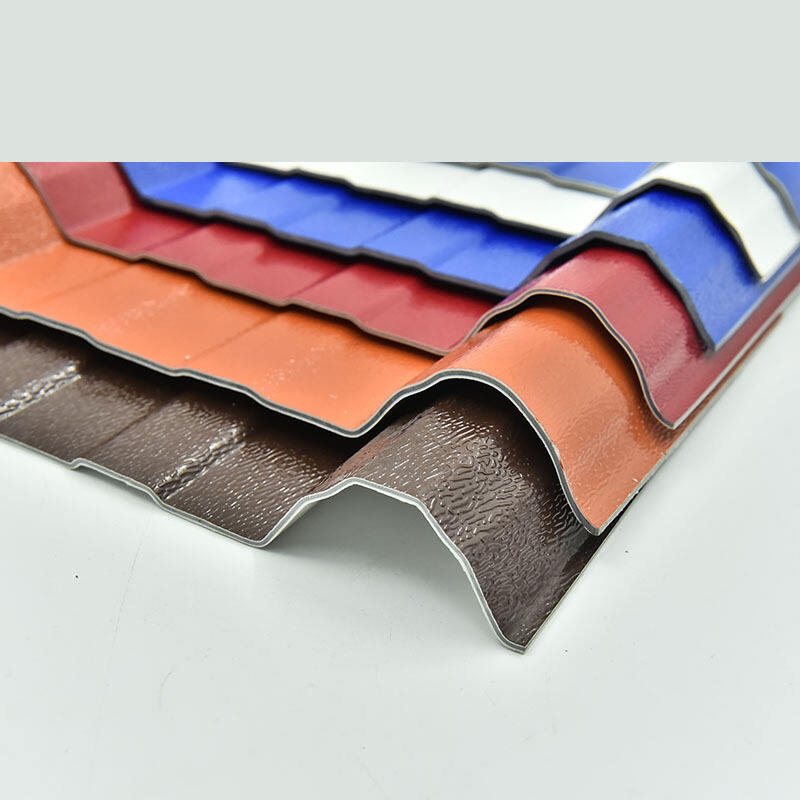
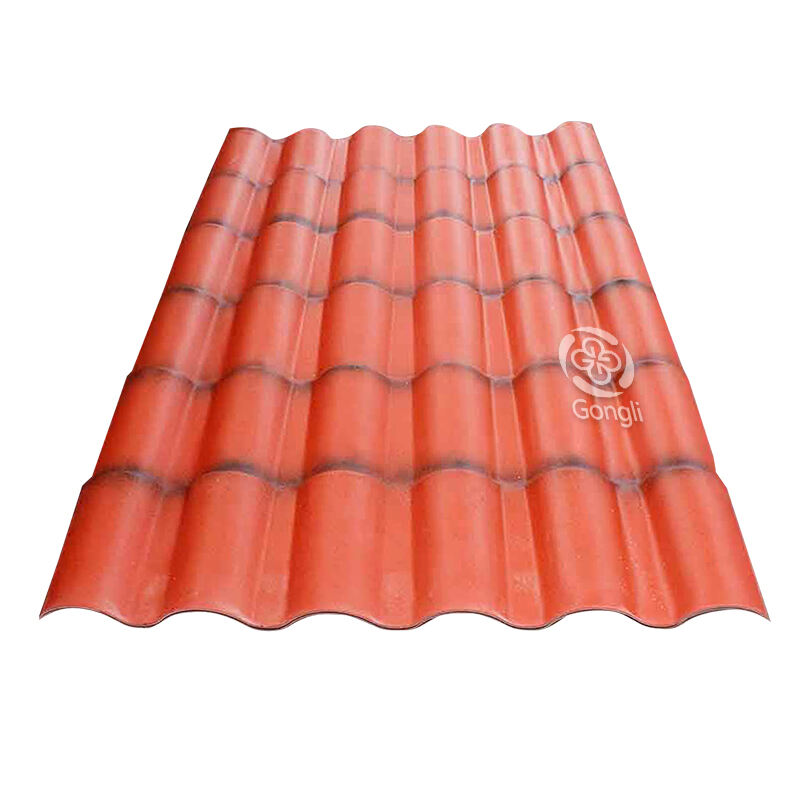
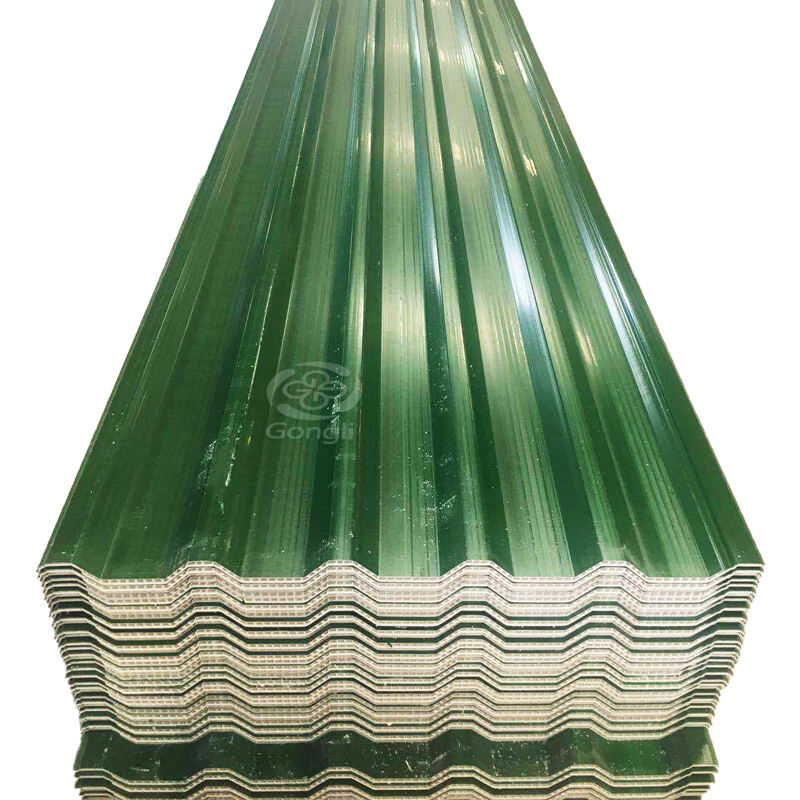
តើត្រូវប្រុងប្រយ័ត្នអ្វីខ្លះក្នុងការដំឡើងសន្លឹកដំបូល UPVC?
ការវាយតម្លៃរចនាសម្ព័ន្ធដំបូល និងការរៀបចំផ្ទៃ
ការវាយតម្លៃសមត្ថភាពទម្ងន់ និងស្ថានភាពនៃស្ថានភាពគ្រឹះមុនពេលដំឡើងសន្លឹកដំបូល UPVC
ការធ្វើការវាយតម្លៃរចនាសម្ព័ន្ធឱ្យបានត្រឹមត្រូវមុនពេលដំឡើងសន្លឹកដំបូល UPVC គឺជាជំហានដែលគេមិនអាចមើលរំលងបានទេ ប្រសិនបើយើងចង់បានលទ្ធផលដែលមានសុវត្ថិភាព និងយូរអង្វែង។ អ្នកវិស្វកររចនាសម្ព័ន្ធប្រាប់យើងថា បញ្ហាដំបូលប្រហែល 60% ដែលកើតឡើងនៅដើមដំបូង គឺបណ្តាលមកពីការមិនបានធ្វើជំហានសំខាន់នេះ។ នៅពេលពិនិត្យសមត្ថភាពទម្ងន់ ត្រូវធ្វើការសមាមាត្រទម្ងន់ដែលគិតគូរពីលក្ខខណ្ឌជាក់ស្តែងដូចជាកំលាំងខ្យល់ដែលបំបែកឡើងលើ (wind uplift forces) ដែលត្រូវតែលើសពី 40 ផោងក្នុងមួយហ្វីតការ៉េនៅតាមតំបន់ដែលងាយរងគ្រោះដោយខ្យល់ព្យុះហ្វូងា និងទម្ងន់ពុកៗដែលគួរទប់ទល់បានយ៉ាងហោចណាស់ 50 ផោងក្នុងមួយហ្វីតការ៉េនៅតាមតំបន់ត្រជាក់។ ក្នុងអំឡុងពេលធ្វើការគណនាទាំងនេះ កុំភ្លេចពិនិត្យមើលផ្នែកខាងក្រោមដែរ។ ត្រូវពិនិត្យដែកឈើ purlins សម្រាប់រកសញ្ញារលួយ ហើយបញ្ជាក់ថាកំរាលបេតុងអាចទប់ទល់នឹងកំហាប់លើសពី 3,500 psi។ ត្រូវតាមដានការសង្កេតទាំងអស់នេះដោយអនុលោមតាមលំដាប់អាទិភាពច្បាស់លាស់ ដើម្បីកុំឱ្យខកខានអ្វីមួយក្នុងអំឡុងពេលរៀបចំការដំឡើង។
| លំដាប់អាទិភាពនៃការវាយតម្លៃ | ការពិនិត្យសំខាន់ៗ | កំហុសអត់ទោស |
|---|---|---|
| ភាពរឹងមាំនៃរចនាសម្ព័ន្ធ | ការបត់បែនរបស់ដែកគៃ សញ្ញារលួយ | សមាមាត្រអតិបរមា 1/240 នៃវាល |
| មុខងារផ្ទាំង | ការគណនាទម្ងន់ស្ងួត + ទម្ងន់រស់ | ចន្លោះសុវត្ថិភាពអប្បបរមា 35% |
| ភាពមិនស្មើនៃផ្ទៃ | ដីធ្លុះ ឬ គ្រឿងភ្ជាប់ដែលដោះចេញ | 1/8" ក្នុងរាល់ 10ហ្វីត នៃភាពខុសគ្នា |
ត្រូវដោះស្រាយគ្រោះថ្នាក់ដែលមានគ្រោះថ្នាក់ដែលមានដែកដែកចោល ឬ ដែកគ្រែងដែលខូចមុននឹងបន្តការដំឡើង; ការមិនធ្វើដូច្នេះនឹងធ្វើឱ្យប្រព័ន្ធផ្លូវការ UPVC ទាំងមូលខូចបាតុភាព។ គួររៀបចំថវិកាសម្រាប់ការធ្វើឱ្យប្រសើរឡើងនូវដែកបង្កើនកម្លាំង នៅតាមតំបន់ដែលកម្លាំងទម្ងន់ទាបជាងកម្មវិធីសាងសង់តាមតំបន់; វិធីនេះជួយជៀសវាងការកែតម្រូវឡើងវិញដែលមានថ្លៃខ្ពស់នាពេលក្រោយ
សម្អាត កំរិត និងបិទបន្ទះផ្ទៃដំបូល ដើម្បីធានាការជាប់ជាប់យូរ និងភាពធន់ទ្រាំនឹងពន្លឺយូវី
របៀបដែលត្រូវរៀបចំផ្ទៃ ពិតជាមានឥទ្ធិពលដល់សមត្ថភាពដំណើរការរបស់ដំបូល UPVC ច្រើនជាងគ្រាន់តែរបៀបដែលវាត្រូវបានដំឡើង។ ការសិក្សាលើវិទ្យាសាស្ត្រអំពីការជាប់គ្នា បានបញ្ជាក់ថា ផ្ទៃដែលប្រេះប្រឡូក ឬឆ្លងមេរោគ គឺជាមូលហេតុនៃបញ្ហាប្រហែល 72% ទាក់ទងនឹងការជាប់គ្នារបស់សារធាតុជាប់។ នេះគឺជាអ្វីដែលដំណើរការបានល្អបំផុត៖ ចាប់ផ្តើមដោយការបូមសំអាតដោយសារធាតុខ្លាំងមិនលើសពី 2000 psi។ វិធីនេះនឹងដកចោលនូវអុកស៊ីដេស្យុង ធូលី និងការលូតលាស់របស់សរីរាង្គដែលរំខានទាំងឡាយ ដោយមិនបណ្តាលឱ្យមានរន្ធឬស្នាមខ្លះឡើយ។ បន្ទាប់មក កែតម្រូវផ្នែកដែលចុះជ្រៅជាងមួយភាគបួនអ៊ិន្ឈ៍ ដោយប្រើសារធាតុអេប៉ុកស៊ីដែលអាចស្មើនឹងខ្លួនវាផ្ទាល់។ ចុងក្រោយ ត្រូវដាក់សារធាតុលាបដំបូងដែលមានស្ថេរភាពកាំរស្មី UV ក្នុងរយៈពេលបួនម៉ោងបន្ទាប់ពីសំអាត។ ប្រើវិធីលាបដោយវិលជុំជុំជាគ្រាប់បណ្តាញ (cross hatch rolling method) ដើម្បីឱ្យវាស្មើនឹងប្រហែល 3 mil។ តើកើតអ្វីក្រោយមក? សារធាតុគីមីនឹងបង្កើតភាពជាប់គ្នាយ៉ាងមាំ ទប់ទល់នឹងការប្រែប្រួលសីតុណ្ហភាព និងទប់ទល់នឹងការពិតដែល UPVC ពង្រីកប្រហែល 4.5% ក្នុងមួយឆ្នាំ។ ហើយនេះគឺជារឿងមួយដែលមនុស្សភាគច្រើនភ្លេច៖ រង់ចាំពេលវេលា 24 ម៉ោងពេញលេញមុននឹងដាក់សន្លឹកចុះ។ ការប្រញាប់ប្រញាល់ក្នុងដំណាក់កាលនេះ នឹងធ្វើឱ្យកម្លាំងជាប់គ្នាថយចុះពាក់កណ្តាល ដែលគ្មាននរណាម្នាក់ចង់បាននោះ នៅពេលដែលយើងកំពុងដោះស្រាយជាមួយសម្ភារៈដំបូលដែលថ្លៃថ្នូរ។
ការរៀបចំសន្ទះ Purlin និងភាពសอดคลែងជាមួយនឹងទ្រនិចសម្រាប់សន្លឹកដំបូល UPVC
ចន្លោះសន្ទះ Purlin ដែលបានកំណត់ប្រកបដោយប្រសិទ្ធភាព ការតម្រឹម និងប្រេកង់គាំទ្រដើម្បីការពារការធ្លាក់ចុះ ឬការញ័រ
ការដំឡើងសន្ទះបិទបើកឱ្យបានត្រឹមត្រូវ គឺជួយការពារបញ្ហាដូចជា ការខូចទ្រង់ទ្រាយ និងការញ័រដោយគ្មានការគ្រប់គ្រងនៅក្នុងប្រព័ន្ធគ្របដំបូល UPVC។ ការដំឡើងភាគច្រើននឹងដំណើរការបានល្អបំផុត នៅពេលដែលសន្ទះបិទបើកមានចម្ងាយពីកណ្ដាលទៅកណ្ដាលប្រហែល 600 ទៅ 900 មីលីម៉ែត្រ។ ប៉ុន្តែប្រសិនបើយើងនិយាយអំពីតំបន់ដែលមានព្យុះខ្លាំង ឬពិរុទ្ធកក់ក្ដៅច្រើន ការបន្ថយចម្ងាយនេះឱ្យនៅសល់មិនលើសពី 600 មម គឺជាការសមរម្យសម្រាប់ភាពស្ថិរភាពបន្ថែម។ ក្នុងកំឡុងពេលដំឡើង ត្រូវរក្សាឱ្យវាស្មើគ្នាឲ្យបានច្រើនតាមដែលអាចធ្វើទៅបាន ក្នុងចន្លោះប្រហែល 5 មម នៅទូទាំងតំបន់ដំបូល ដើម្បីឱ្យទម្ងន់ត្រូវបានចែកចាយស្មើគ្នា។ សន្លឹកគ្របដំបូលគ្រប់សន្លឹកត្រូវការការគាំទ្រនៅចុងទាំងពីរយ៉ាងហោចណាស់ ទោះបីជាសន្លឹកវែង (លើសពីបីម៉ែត្រ) ក៏នឹងទទួលបានអត្ថប្រយោជន៍ពីសន្ទះបិទបើកបន្ថែមមួយនៅចន្លោះកណ្ដាលក៏ដោយ។ កុំភ្លេចចន្លោះពង្រីកតូចៗ ប៉ុន្តែសំខាន់ៗទាំងនោះដែរ។ ត្រូវទុកចន្លោះប្រហែល 3 ទៅ 5 មម រវាងសន្លឹកសម្ភារៈគ្រប់មួយម៉ែត្រ ដើម្បីឱ្យវាអាចពង្រីក និងបង្រួមដោយធម្មជាតិតាមការផ្លាស់ប្ដូរសីតុណ្ហភាព។ ហើយនៅពេលដំឡើងសន្លឹកទាំងនោះ ត្រូវប្រើស្ក្រួវដែលមិនច្រៀក ដែលដាក់ប្រហែលរៀងរាល់ពាក់កណ្ដាលម៉ែត្រមួយដង តាមបណ្ដោយសន្ទះបិទបើក។ គ្រាន់តែប្រយ័ត្នកុំបិទវាច្រើនពេក ព្រោះសម្ពាធលើសនឹងអាចបំផ្លាញរចនាសម្ព័ន្ធកោសិកាខាងក្នុងនៃសម្ភារៈ UPVC តាមពេលវេលាបាន។
តម្រូវការអប្បបរមាសម្រាប់ការជ្រុះដំបូល និងការរៀបចំប្រព័ន្ធស្រោបស្រង់ ដើម្បីជៀសវាងការកកើតទឹក និងការហូរចេញ
រក្សាការជ្រុះដំបូលអប្បបរមាចំនួន ៥ ដឺក្រេ ដើម្បីធានាការហូរចេញនៃទឹកប្រកបដោយប្រសិទ្ធភាព។ សម្រាប់ការជ្រុះក្រោម ១០ ដឺក្រេ សូមបន្ថែមផ្នែកទ្វេដងនៅចុងដល់ ៣០០ មម ដើម្បីបង្កើតរបាំងដែលបិទជិត ប្រឆាំងនឹងភ្លៀងដែលបក់មកជាមួយខ្យល់។ ការរចនាប្រព័ន្ធស្រោបស្រង់ត្រូវផ្តោតលើ៖
- ការគ្របដណ្តប់ពេញលេញនៃប្រព័ន្ធគ្រាប់ទឹកសម្រាប់ទឹកភ្លៀងធ្លាក់ខ្លាំងបំផុត
- ទ្រង់ទ្រាយផ្ទៃទៅកាន់ច្រកចេញដោយមានកម្រិតទម្លុះ ២ ដឺក្រេ
- ការដកចេញនូវតំបន់រាបស្មើ ដែលសំរាមអាចកកើត
គណនាសមត្ថភាពបំពង់ចោលទឹកដោយប្រើទិន្នន័យអំពីកម្លាំងភ្លៀងក្នុងតំបន់។ ឧទាហរណ៍ ៧៥ មម/ម៉ោង នៅតំបន់សើមក្តៅ។ ការសម្អាតសំរាមជាប្រចាំ នឹងធានាការដំណើរការដោយគ្មានការហូរចេញ ក្នុងអំឡុងអាយុកាលប្រើប្រាស់របស់ប្រព័ន្ធ UPVC
ការគ្រប់គ្រងការពង្រីកដោយសារកំដៅ និងប្រតិវិធីការដំឡើង
ការគណនា និងរក្សាចន្លោះពង្រីក និងការតភ្ជាប់ដោយមានការរៀបចំជាជំហានៗ សម្រាប់ចលនាដែលបណ្តាលមកពីការប្រែប្រួលសីតុណ្ហភាព
នៅពេលសីតុណ្ហភាពកើនឡើង និងថយចុះ សន្លឹកគ្របដំបូល UPVC ពិតជាប្រែកាយទំហំយ៉ាងច្រើន។ យើងកំពុងនិយាយអំពីការផ្លាស់ទីប្រហែល 7 មម នៅលើសន្លឹកបន្ទះ 3 ម៉ែត្រ សម្រាប់រាល់ការប្រែប្រួលសីតុណ្ហភាព 10 ដឺក្រេសែលស៊ីយ៉ូស (Celsius) យោងតាមការស្រាវជ្រាវពីស្ថាប័នវិទ្យាសាស្ត្រប៉ូលីម៉ែរកាលពីឆ្នាំ 2023។ ប្រសិនបើអ្នកសាងសង់មើលរំលងឥរិយាបថការរីករាលដាលនេះ បញ្ហាផ្សេងៗនឹងចាប់ផ្តើមកើតឡើងដូចជាសន្លឹកបន្ទះខូចរលឹម ស្ក្រូវធូរ និងការបង្កើតជាចន្លោះរវាងសន្លឹកបន្ទះ។ ដើម្បីកំណត់ថាត្រូវទុកចន្លោះប៉ុន្មានរវាងសន្លឹកបន្ទះ អ្នកទទួលជើងគ្រាប់គួរតែគុណប្រវែងនៃសន្លឹកនីមួយៗនឹង 0.07 មម ក្នុងមួយម៉ែត្រក្នុងមួយដឺក្រេសែលស៊ីយ៉ូសនៃភាពខុសគ្នានៃអាកាសធាតុក្នុងតំបន់របស់ពួកគេ។ យកឧទាហរណ៍ដំបូលស្តង់ដារ 6 ម៉ែត្រ ដែលអាចមានការប្រែប្រួលសីតុណ្ហភាពប្រហែល 40 ដឺក្រេ នោះមានន័យថាត្រូវទុកប្រហែល 16.8 មម នៅចុងនីមួយៗ។ អ្នកដំឡើងដែលឆ្លាតក៏នឹងរៀបចន្លោះតភ្ជាប់ឱ្យមានលក្ខណៈជាជំរុំពីម្ខាងទៅម្ខាងនៅតាមជួរផ្សេងគ្នា ដើម្បីឱ្យការទប់ទល់ត្រូវបានរំលែកចេញឱ្យបានធម្មជាតិជាង។ ហើយកុំភ្លេចអំពីក្រវ៉ាត់រអិលពិសេសទាំងនោះ ដែលអនុញ្ញាតឱ្យសន្លឹកបន្ទះរអិលតាមទិសដេកដោយមិនបំផ្លាញស្ថេរភាពនៃរចនាសម្ព័ន្ធទាំងមូល។
ការជ្រើសរើសចំណុចតភ្ជាប់ដែលទប់ទល់នឹងការរលួយ ការគ្រប់គ្រងកម្លាំងបង្វិល និងការជៀសវាងការបិទជិតលើសសម្រាប់សន្លឹកដំបូល UPVC
ត្រូវតែប្រើចំណុចតភ្ជាប់ដែកអ៊ីណុកថ្នាក់ 316 ឬចំណុចតភ្ជាប់ដែលគ្របដោយផ្សែងពហុលី ដើម្បីកាត់បន្ថយហានិភ័យនៃការរលួយដោយវិធីថ្ម។ រន្ធដែលធំជាង ឬរន្ធដែលមានរាងវែង អាចទប់ទល់នឹងចលនាកំដៅដោយមិនជាប់គាំង។ ការគ្រប់គ្រងកម្លាំងបង្វិលគឺមានសារៈសំខាន់ណាស់៖
| ប្រភេទចំណុចតភ្ជាប់ | កម្លាំងបង្វិលអតិបរមា | គោលបំណង |
|---|---|---|
| ស្ក្រុវខួងដោយខ្លួនឯង | 3.5 Nm | ការពារការខូចទ្រង់ទ្រាយសន្លឹក |
| ខ្សែក្រវាត់អណ្ដែត | បិទដោយដៃ + បង្វិល ¼ ដង | អនុញ្ញាតឱ្យរអិលតាមទិសដេក |
ការតែងតូចពេកធ្វើឱ្យម៉ាទ្រីសកោសិកា UPVC បាក់បែក បង្កើតកន្លែងបាក់បែកតូចៗ ដែលរីករាយក្រោមការប៉ះពាល់រស្មី UV។ ភ្ជាប់ស្នឹបទាំងអស់ជាមួយនឹងវ៉ាស៊ើ EPDM ដែលមានស៊ីលបញ្ចូល; វាជួយរក្សាភាពជាប់ល្អិតល្អន់ ខណៈពេលដែលអនុញ្ញាតឱ្យមានចលនាតូចៗដែលគ្រប់គ្រងបាន។
ការការពារអាកាសធាតុ ការបិទជិត និងការដោះស្រាយសន្តិសុខសម្រាប់សន្លឹកដំបូល UPVC
ស្តង់ដារផ្នែកខាងក្រៅ និងខាងចុង ការរៀបចំចំណុចតភ្ជាប់ និងបច្ចេកទេសការពារការហូរចេញ
ការកំណត់ចំណុចទាក់ទងគ្នាឱ្យបានត្រឹមត្រូវគឺពិតជាមានសារៈសំខាន់ណាស់ នៅពេលនិយាយដល់ការរក្សាបន្ទះដំបូល UPVC មិនឱ្យជ្រាបទឹក។ ក្បួនច្បាប់សាងសង់ភាគច្រើនបញ្ជាក់ថា គួរមានចំណុចទាក់គ្នានៅតាមជ្រុងប្រហែល 150 មម ហើយប្រហែល 200 មម សម្រាប់ចំណុចទាក់គ្នានៅចុង។ ការវាស់វែងទាំងនេះជួយការពារកុំឱ្យទឹកល្ងីល្ងើចូលតាមរន្ធតូចៗ ឬធ្វើចលនាតាមទិសដេកតាមបណ្តោយបន្ទះ។ វិធីសាកសួរល្អមួយគឺត្រូវរៀបចំចំណុចតភ្ជាប់ទាំងនោះឱ្យមានលក្ខណៈជាជួរដេកដូចជាការដាក់ឥដ្ឋ ដែលនឹងបំបែកខ្សែបន្ទាត់ដេកដែលជាទូទៅជាកន្លែងដែលមានការហូរចេញច្រើនបំផុត។ គែមបន្ទះធ្លាក់ទឹកគួរតែដាក់ជ្រៀកចេញពីក្តារក្រោមប្រហែល 40 មម ដើម្បីធានាថាទឹកភ្លៀងហូរចេញបានល្អ ហើយមិនឱ្យស្ទុះនៅជិតរចនាសម្ព័ន្ធមូលដ្ឋានខាងក្រោម។ កុំភ្លេចពីចន្លោះពង្រីកដែលត្រូវការប្រហែល 3 មម ក្នុងមួយម៉ែត្រនៃប្រវែងបន្ទះនោះដែរ។ សូមពិនិត្យមើលថាតើអ្វីដែលសមស្រប ដោយផ្អែកលើការប្រែប្រួលសីតុណ្ហភាពដែលធម្មតាកើតមានក្នុងតំបន់របស់អ្នកតាមរដូវកាល។
| ធាតុការពារទឹក | តម្រូវការអប្បបរមា | មុខងារ |
|---|---|---|
| ចំណុចទាក់គ្នានៅតាមជ្រុង | 150មីលីម៉ែត្រ | ការពារកុំឱ្យទឹកភ្លៀងដែលបក់ដោយខ្យល់ចូល |
| រារាំងការធ្វើចលនាក្តៅទឹកតាមទិសដេក | 200ម.ម. | រារាំងការធ្វើចលនាក្តៅទឹកតាមទិសដេក |
| ចន្លោះពង្រីក | 3មម ក្នុងមួយម៉ែត្រ | ទប់ទល់នឹងការរីករាយដោយសារកំដៅ |
វិធីសាកសែនសម្រាប់ចំណុចភ្ជាប់ កន្លែងត្រួតគ្នា និងកន្លែងដែលឆ្លងកាត់ ដើម្បីធានាភាពជាប់ល្អិតល្អ័យពីទឹក
ការឆ្លងកាត់គ្រប់គ្រាប់លើដំបូល រួមទាំងបំពង់បញ្ចេញខ្យល់ និងបង្អួចពន្លឺថ្ងៃ ត្រូវការការប្រើស្ករ៉ឺបប៊្យូទីល (butyl tape) នៅខាងក្រោម បន្ទាប់មកបិទជិតដោយសារធាតុបិទជិត polyurethane។ សម្រាប់ចំណុចភ្ជាប់៖
- ប្រើវ៉ាសហ៊ែរ EPDM នៅក្រោមក្បាលស្ក្រូ
- បិទជិតដោយសារធាតុបិទជិតស៊ីលីកូន (silicone sealant) ដែលធន់នឹងពន្លឺអ៊ុលត្រាវីយូឡេត (UV-stable) បន្ទាប់ពីដំឡើង
- បិទកន្លែងត្រួតគ្នាដោយបន្ទះបន្ទាត់បន្តនៃសារធាតុបិទជិតដែលឆបគ្នា
ការសិក្សាអំពីសមត្ថភាពមេមប្រៀនមួយនៅឆ្នាំ 2023 បានរកឃើញថា ការបិទជិតឲ្យបានត្រឹមត្រូវអាចកាត់បន្ថយករណីហូរទឹកចុះដល់ 78% ធៀបនឹងការដំឡើងដែលគ្មានការបិទជិត។ សូមធ្វើតាមប្រតិវិធីបិទជិតដែលបានអនុម័តដោយឧស្សាហកម្ម ដោយប្រើសម្ភារៈដែលបានធ្វើតេស្តសម្រាប់ភាពឆបគ្នា
វិធីប្រើប្រាស់ល្អបំផុតសម្រាប់ការកាត់ ការលើក និងការដោះស្រាយនៅកន្លែងការងារ ដើម្បីការពារការបែកតូចៗ និងការវិល
គាំទ្រសន្លឹកពេញប្រវែងរៀងរាល់ 1.5 ម៉ែត្រក្នុងអំឡុងពេលដឹកជញ្ជូន ដើម្បីការពារការបែកដោយសារតែការតានតឹង។ ប្រើឧបករណ៍លើកដោយសុញ្ញាកាស ឬដែកចែកចាយ ជំនួសឱ្យការបត់ដោយដៃ ដើម្បីលើកសន្លឹកឡើង; កុំឱ្យលើសពីដែនកំណត់ដែលអាចបត់បាន 2% របស់ UPVC។ នៅពេលកាត់៖
- ប្រើផ្នែកកាត់ដែលមានធ្មេញសម្រាប់កាត់ដោយប្រើសារធាតុកាប៊ីដ (carbide-tipped saw blades)
- រក្សាភាពលឿននៃការបង្វិលតិចជាង 3,000 RPM
- ដកជ្រុងដែលមានសំបកដោយក្រដាសអាប់ដែលមានគ្រាប់ល្អិត
រក្សាទុកសន្លឹកដាក់ផ្តេកលើគ្រែដែលមានប៉ាត់ និងរន្ធខាងក្នុង ហើយកុំដាក់ផ្ទាល់លើដីទទេ។ ការដំឡើង ឬដឹកជញ្ជូនមិនត្រឹមត្រូវនឹងបង្កើតរន្ធតូចៗដែលធ្វើឲ្យសមត្ថភាពទប់ទល់នឹងការប៉ះទង្គិចថយចុះដល់ទៅ 40% យោងតាមការស្រាវជ្រាវលើការខូចខាតដោយសារការប្រើប្រាស់វែងនិងសារធាតុ
សំណួរញឹកញាប់
ហេតុអ្វីបានជាការវាយតម្លៃរចនាសម្ព័ន្ធមានសារៈសំខាន់មុនពេលដំឡើងសន្លឹកដំបូល UPVC?
ការវាយតម្លៃរចនាសម្ព័ន្ធគឺមានសារៈសំខាន់ដើម្បីធានាថាស្ថានីយ៍គាំទ្រអាចទ្រទ្រង់ប្រព័ន្ធដំបូលបាន។ ប្រសិនបើគ្មានវា បញ្ហាដំបូលដែលកើតមុនពេលវេលាដូចជាសមត្ថភាពទម្ងន់មិនគ្រប់គ្រាន់ និងបញ្ហាស្ថេរភាពរចនាសម្ព័ន្ធអាចកើតមានឡើង
តើគន្លាតពង្រីកណាខ្លះដែលបានណែនាំសម្រាប់សន្លឹកដំបូល UPVC?
គន្លាតពង្រីកដែលបានណែនាំសម្រាប់សន្លឹកដំបូល UPVC គឺប្រហែល 3 ទៅ 5 មម ក្នុងមួយម៉ែត្រនៃសម្ភារៈសន្លឹក ដើម្បីទុកចន្លោះសម្រាប់ការពង្រីក និងបង្រួមដែលបណ្តាលមកពីសីតុណ្ហភាព
ហេតុអ្វីបានជាសំខាន់ក្នុងការប្រើស្នូកដែលមិនងាយខូចដោយសារការរលួយ?
ការប្រើប្រាស់ស្នូប្រឆាំងនឹងការរលួយ គឺជៀសវាងហានិភ័យនៃការរលួយដោយសារអគ្គិសនីគីមី ដែលអាចធ្វើឱ្យស្ថេរភាពរបស់ប្រព័ន្ធគ្រែបដំបូលខូចខាតតាមពេលវេលា ជាពិសេសក្រោមកាំរស្មីយូវី។
ផលិតផលដែលបានណែនាំ

ព័ត៌មានក្តៅ
-
របៀបជ្រើសរើសថ្មដែកដែលត្រឹមត្រូវ
2024-01-24
-
ថ្មប្លាយ PVC: ម៉ាតិកាលសម្រាប់ការសាងសង់ដែក
2024-01-24
-
សំណុំសំខាន់សម្រាប់ការផលិតថ្មដែកស៊ីនថេសីស
2024-01-24